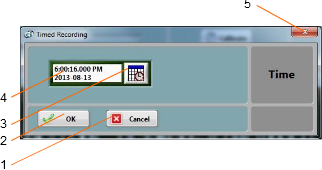
When the Timer button is pressed, the timer settings panel appears.
Either use the direct entry field (Figure 14 (4)), or press the Calendar View button (Figure 14 (3)) to set the date and time when the recording must start.
Press the OK button to exit and arm the timer.
Press the Cancel button, or the Window-Close button to exit without arming the timer.

Figure 14 Timer Settings Panel
| 1. | Cancel button – Closes the window without arming the timer |
| 2. | OK button – Closes the window and arms the timer |
| 3. | Calendar button – Brings the calendar view to enter date and time |
| 4. | Date/Time field – Can be used to enter date and time directly |
| 5. | Window close button - Closes the window without arming the timer |

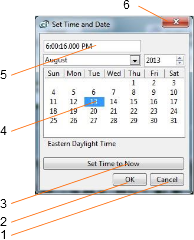
Figure 15 Calendar View
| 1. | Cancel button – Closes the window without changing the date/time setting |
| 2. | OK button – Closes the window and accepts the newly set date/time |
| 3. | Set to Now button – Set the time and date to the present time |
| 4. | Date setting field – Click a date to set |
| 5. | Time setting field – Use the field to set a new time |
| 6. | Window close button - Closes the window without changing the date/time setting |


